

Azure Blob Storage is Microsoft's object storage solution for the cloud. Blob storage is optimized for storing massive amounts of unstructured data. Unstructured data is data that doesn't adhere to a particular data model or definition, such as text or binary data.
In this article I will walk you through how to use the Azure Blob Storage client library v12 for .NET to upload file into the Blob Storage.
Prerequisites
- Azure Subscription
- Azure Storage Account
- .Net Core 6 SDK
Setting Up
The first step is to create a storage account in your Microsoft Azure account. In this article we wont be covering the steps needed to create an Azure Storage account, you can read here and here if you want to know how to do that.
Creating ASP.Net Core Web API Project
Since our goal is to upload real file into Azure Storage, let's start by creating an ASP.Net Core Web API.
Create a new Web Api project named BlobStorage.API refer to the screenshot below:

Make sure you select the latest .Net framework - 6.0 like so:

Install the v12 Package
The package will we be using is the version v12 and its name Azure.Storage.Blobs. In your package manager console type the commane below:
Copy your access keys from Azure Portal
Sign in to your Azure Portal and locate your storage account. In the storage account menu pane, under Security + networking, select Access keys. Here, you can view the account access keys and the complete connection string for each key.
Adding Connection String to appsettings.json
In the appsettings.json file in the root of our Web API project let's add a section called azure and then add both the storage container name and connection string like so:

Implementing Upload in Code
Let's start by writting the whole code that will be responsible for the uploads. In this tutorial, I will be writting a reusable code.
What we want to achieve:
- Upload file into Blob Storage
- Get the upload Uri, file type and file extension back as a response
For this purpose, let's create a DTO that will represent the Upload response details. In the models folder, create a class and name it AzureUploadResponseModel like so:
Create the upload service
Within our project, create a folder named Services, and add an Interface named IAzureStorageService like so:
Next, create another class within the Services folder named AzureStorageService and let it implement the IAzureStorageService like so:
Creating Helper class to Get Content Type
As you can see that we are calling an extension method to get content type of a file like so filePath.GetContentType().
This is an extention method that we will create next. Create a folder named StorageExtension and create a class named StorageHelpers. In the helper method, we will use FileExtensionContentTypeProvider to get file content type and also validate file type.
Using the Upload Service
In order to use the upload service, the first step is to inject BlogClient in our project Program.cs - this is called dependency injection like so:
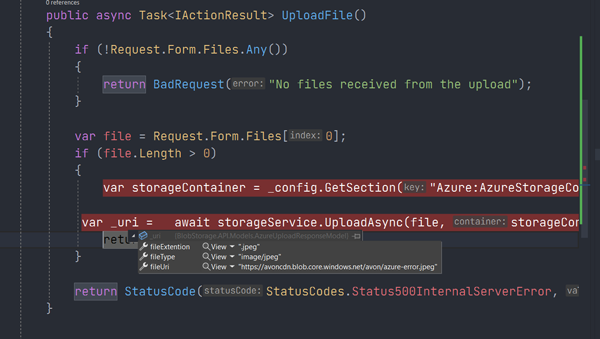
Let's create an API contoller named upload and paste the following code.
If you try to send a file via postman you should get the result that is similar to this:
Conclusion
In this article, we have learned how to upload to Azure Blob Storage and also get back the upload Uri.
Thanks for your time.
Post a Comment
0Comments